How to Use a Baitcasting Reel
This year while working the Carrot Stix booth at the
Ultimate Fishing Expo in Novi Michigan we received a lot of input from people
about being shy to use bait caster reels. With that being said I decided to
publish this article.
First things first you need to select a reel. Unfortunately
you need start out with a semi decent reel, so those cheap $25 dollar reels are
not going to help you out at all. I suggest starting with a reel that normally
retails for about $50 and preferably has at least 5 bearings. A reel in this
price range should be mechanically sound enough for someone to learn how to use
a bait caster.
Now we are going to explain the mechanics behind the knobs
on the bait caster that is used in relation to casting. Let’s look at Carrot Stix CCX2001-C2 bait
casting reel.

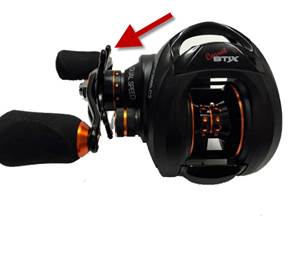
The knob on the left is the tension knob. The purpose of
this knob is to provide tension on the spool. There is a spring inside of that
knob, as you tighten the knob, the spring applies more force on the spool. At the end of
the cast, the lure stops and the spool keeps turning. The tension control is
used to stop the spool shaft at the same time that the lure stops.
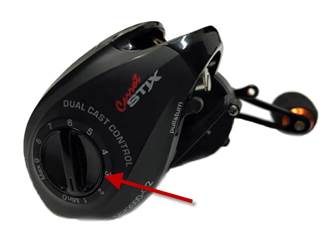
On the right side is the magnetic brake. Magnetic controls work on the principal that the
spool and magnets make a generator (alternator). The process of generating
requires more input energy as the speed of the generator speeds up. Thus you
have a form of electric braking. The clearance between the spool and the
magnets controls the rate and amount of the braking. This is adjustable from
the outside of the reel. The higher the setting the more brake that is
applied.
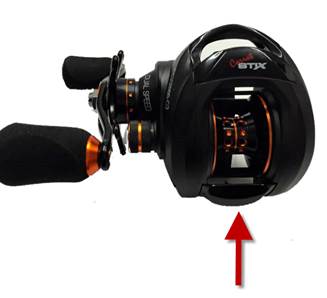
The button at the bottom is referred to as the thumb bar. Depressing
this button releases the spool and this is where your thumb will rest so that
you can apply pressure the fishing line on the spool using your thumb.
The star shaped lever is the drag. The drag is the amount of
tension applied to the spool when going in reverse.
So know that you know what the components are we can start
by talking about setting everything up.
Here is what I recommend you get:
-
15 lb to 17 lb monofilament line
-
A detachable line counter
-
A half ounce bait, preferably a spinner bait.
-
Line conditioner
-
bait casting reel
-
A bait casting rod no longer than 7ft
We use mono-filament line because it is cheap and has some
stretch, which will help us out because it will be a little more forgiving. Thread
the line through the rod and use an arbor knot to tie the line to the spool.
Getting the line around the spool can be a little tricky. Use a pair of needle
nose pliers to grab the line and help guide it around the spool.
Once the arbor knot is tied, attach the line counter near
the eyelet on the rod making sure that the line stays going through the line
counter. The line counter will likely count backwards. Put a pencil through the
center hole of the monofilament line spool. While wearing socks and on carpet,
put your feet on either side of the pencil and apply slight pressure. The goal
is to just keep enough tension on the line spool to keep the line tight on the reel.
Start winding the reel and put about 120 feet of line on the reel. The reason
for only putting on a 120 feet is that you
will not likely cast over 120 feet when learning and if you do get a back lash,
there is a small amount of line on the reel to have to untangle.
Once you have enough line on the reel, tie on your ½ ounce bait.
Remove the line counter and spray the line on the reel with the line conditioner.
The line conditioner will lubricate the line, making the line come off the reel
easier, keeps the line from pinching itself off (it will snap and break) and
provides some lubrication between your thumb and the line.
What
is a backlash? Backlash occurs when the spool over runs the cast or
continues to spin after the lure has met with resistance as it is traveling.
This most often happens when it hits the water but can also happen on a windy
day where the wind is what provides that resistance. To lessen the chance of
backlash you need to properly adjust your tension and brake.
To set your tension, hold the tip of the rod at about
11 o’clock, tighten the tension down some, then use the thumb bar and release
the bait while holding your thumb on the spool. Loosen or tighten the tension knob
until the bait slowly falls to the floor. Then set the magnetic brake to about
7.
Now you are ready to start casting. Remember not to try
to go for the home run cast here. Just use a steady cast while holding your
thumb down on the spool. What you need to work on here is how much pressure to
apply on the spool using your thumb so you can control the speed of the spool. Remember
to apply more pressure to the spool to slow it down before your lure hits the water.
Also don’t pull back hard on the back swing and be
careful not to let the spool go with your thumb on the back swing, I have done
this a few time in the pouring rain which makes a beautiful birds nest that you
have to dig out later. If you get any back lashes or loops in your line, start
pulling the line off the reel by hand while holding your thumb on the spool.
You will feel it in your thumb when the loop or back lash is gone. Then grab
the line before the reel and start winding. Guide the line through your hand removing
any loops or knots. Once the line is all reeled in, you’re ready to try again. If
the back lash it too big or you cannot get it untied, it may be necessary to
cut the line out and restring the reel.
Once you have gotten used to using your thumb and
minimizing your backlashes you can move on to loosening the magnetic brakes,
using different line and using different lure weight. Remember that practice makes perfect and in
most people get pretty good at this within a couple of weeks. Then you can move
onto other skills like flipping. Good luck and Tight lines. Follow me on Facebook
at DH Hardcore Fishing.
Dominic Hall
Carrot Stix Pro Staff
DHHardcoreFishing@Gmail.com